
Multichannel Activity
2023/06/22
Page Layout
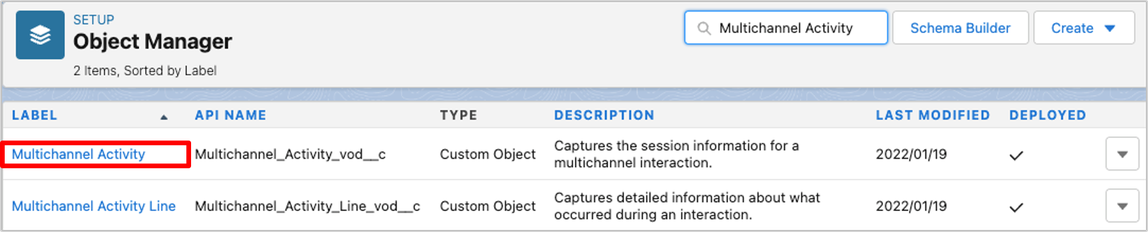
1. Click gear icon at the top right of the screen -[Setup]-[Object Manager] or search for “Object Manager" with a quick search.
2. From the list of custom objects, click “Multichannel Activity”
3. Click “Page Layouts” and press “New” button
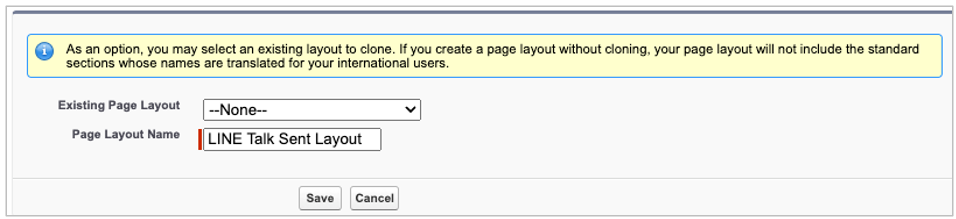
4. On the “Create New Page Layout”, enter the following and click “Save”.
[Page Layout Name] – [LINE Talk Sent Layout]
5. On the edit page, add "Section" from the list at the top of the screen by dragging and dropping to the bottom of the "Custom Links" section.

6. Enter the following in "Section Properties" and press "OK" button
[Section name] – [LINE Talk Sent History]

7. On the edit page, add the "Account" field and "Start Date Time" field from the list at the top of the screen by dragging and dropping.
*Add the fields to the created [LINE Talk Sent History] section.

8. On the edit page, click “Related lists” and add "Multichannel activity lines" to the related list by dragging and dropping from the list at the top of the screen.

9. Click “Related List Properties”

10. Select the following in “Related List Properties” and press the “OK” button.
[Selected Fields] – [Multichannel activity line name]
[Selected Fields] – [LINE Talk Date]
[Selected Fields] – [LINE Message]
[Sort by] – [LINE Talk Date] – [Ascending]
[Apply column information to other page layouts] – [LINE Talk Sent Layout]

11. Click “Save”.
12. Click “Page Layouts” and “New” button
13. On the “Create New Page Layout”, enter the following and click “Save”.
[Page Layout Name] – [LINE Talk Received Layout]

14. Open the section properties of the section "LINE Talk Sent History", edit as follows and press the "OK" button.
[Section Name] – [LINE Talk Received History]

15. Select the following in "Related List Properties" and press the "OK" button.
[Apply column information to other page layouts] – [LINE Talk Received Layout]
16. Click “Save”.
Fields & Relationships
1. Click gear icon at the top right of the screen -[Setup]-[Object Manager] or search for “Object Manager" with a quick search.
2. From the list of custom objects, click “Multichannel Activity”

3. Click “Fields & Relationships” and press “New” button
4. On “Choose the field type” page, select “Text Area(Long) ” and click “Next”.
5. On “Enter the details” page, enter the following information and click “Save”.
[Field Label] – [LINE Talk To]
[Length] – [50,896]
[Visible Lines] – [3]
[Field Name] – [LINE_Talk_To]

6. On “Establish field-level security” page, check “Visible” for Profiles(*) and click “Next”.
* Apply to the authorized user profile on the LINE WORKS Coordination Authorization screen.
7. On “Add to page layouts” page, select ”LINE Talk Sent Layout” and ”LINE Talk Received Layout”, click “Save & New”.
8. On “Choose the field type” page, select “Text Area” and click “Next”.
9. On “Enter the details” page, enter the following information and click “Save”.
[Field Label] – [LINE Talk From]
[Field Name] – [LINE_Talk_From]

10. On “Establish field-level security” page, check “Visible” for Profiles and click “Next”.
11. On “Add to page layouts” page, select ”LINE Talk Sent Layout” and ”LINE Talk Received Layout”, click “Save”.
Record Types
1. Click gear icon at the top right of the screen -[Setup]-[Object Manager] or search for “Object Manager" with a quick search.
2. From the list of custom objects, click “Multichannel Activity”

3. Click “Record Types” and press “New” button
4. On “Enter the details” page, enter the following information, check “make available” box for the relevant profiles(*), and click “Next”.
[Existing Record Type] – Optional
[Record Type Label] – [LINE Talk Sent]
[Record Type Name] – [LINE_Talk_Sent]
[Active] – True

* Apply to the authorized user profile on the LINE WORKS Coordination Authorization screen.
5. On “Assign page layout” page, select “Apply one layout to all profiles” and select “LINE Talk Sent Layout”、and then click “Save & New” button.

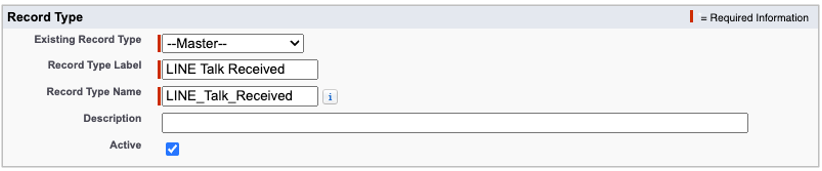
6. On “Enter the details” page, enter the following information, check “make available” box for the relevant profiles(*), and click “Next”.
[Existing Record Type] – Optional
[Record Type Label] – [LINE Talk Received]
[Record Type Name] – [LINE_Talk_Received]
[Active] – True
* Apply to the authorized user profile on the LINE WORKS Coordination Authorization screen.
7. On “Assign page layout” page, select “Apply one layout to all profiles” and select “LINE Talk Received Layout”、and then click “Save” button.

この記事は役に立ちましたか?
0人が役立ったと言っています
ご協力ありがとうございます。